3. How to Use the Page Builder
Video:
Article:
The Convertri Page Builder is where your funnel comes alive: this is where you’ll edit, preview and publish your pages, both desktop and mobile versions.
You’ll find articles that explore all the features listed here in the Page Builder section of our Help site. For now, here’s a quick tour:
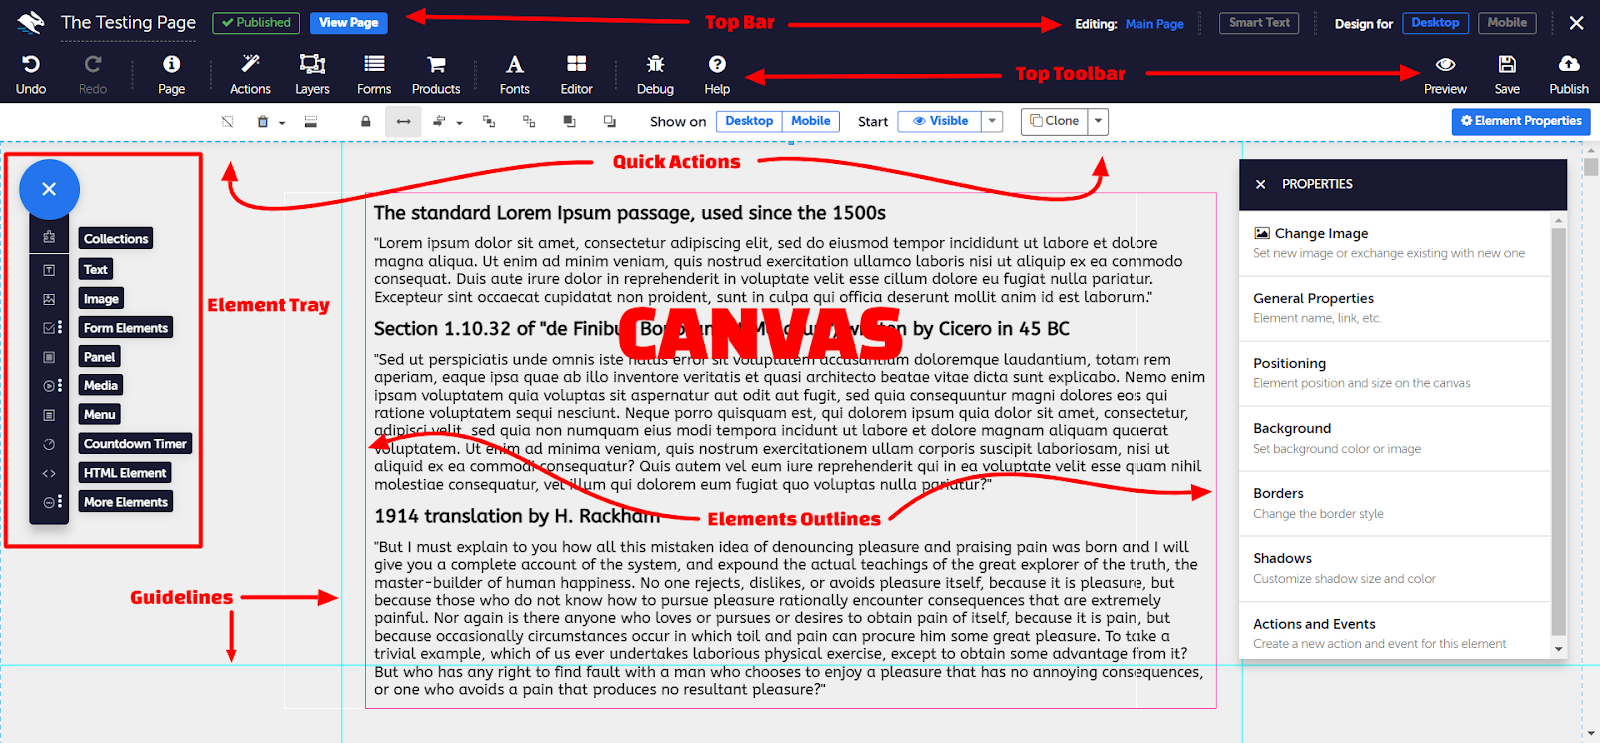
Top Bar
This is where you’ll find the Convertri (hare) logo you’ll click to return to the Dashboard, the Publish status indicator, and the Desktop/Mobile switcher.
- Convertri (hare) logo: click here to return to the Dashboard
- Publish status: this changes from ‘not published yet’ to ‘Published’ when your page is live
- View Page: this option is only visible if the page was published.
- Editing: (Main Page): If you have layer(s) on your page, you will see in this section what/where you are currently editing. e.g when you are currently editing Layer 1 (name of the layer) it’ll display Editing: Layer 1
- Smart Text: when enabled, text elements adjust the size of containers and move other elements in a similar manner to a shift-drag when the text in them is adjusted click here.
- Desktop/Mobile switcher: click to switch between Desktop and Mobile view
Top Toolbar
Here, you’ll find page-wide settings and configurations.
- Undo/Redo
- Page Info - click here to set page properties such as custom CSS, page background, and meta info
- Actions - set page level actions and events
- Layers - create layers on your page (these work great with actions and events!)
- Forms - configure your form to connected services
- Products - choose the product your page will sell
- Fonts - curate all your Google Fonts in here for a customised list
- Editor
- Elements: control element display - Show element outlines, Show hidden elements, and Show element tree.
- Snap Lines & Guides: adjust snap and guide distances
- Guidelines: Adjust gridlines and page width
-
Text: Control how text elements behave
NOTE: Don’t worry about the lines and grids, they’ll only show in the page builder / editor, not on your published page)
- Debug: If you are having issues with your pages, you can now use our debugger tool to debug which scripts, custom HTML elements or custom CSS is the root cause of the problem, click here
Quick Actions Toolbar
When an element is selected, the Quick Actions Toolbar gives you shortcuts to everything you need. You can use these to lock elements in place, center them, move them forward and backward, and more…
- Selection tools - clear, delete elements or remove whitespace above here
- Position tools - lock position, full width, horizontal/vertical alignment, bring to front, send to back, bring forward, or send backward
- Visibility tools - toggle if an element shows on desktop or mobile, start hidden/visible in selected elements ONLY, or start hidden/visible including contents.
- Clone tools - clone element, or clone to another layer or page
- Element Properties - all individual element settings, including positioning, borders, background and links.
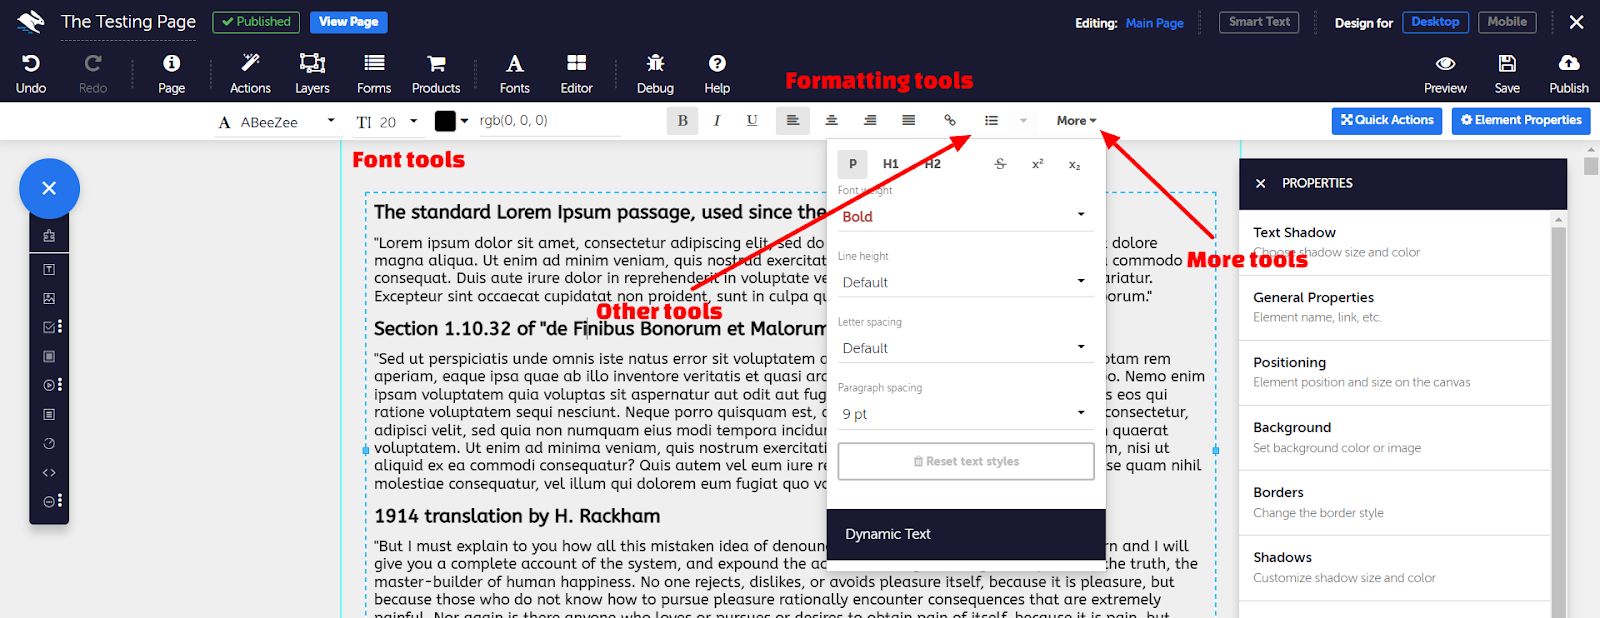
Text Toolbar
When you type inside a text element - instead of simply selecting it - the Quick Access toolbar will be replaced with the Text Toolbar.
- Font tools - choose your font, size and color
- Formatting tools - bold, underline, italic, and alignment
- Other text tools - hyperlink/remove link, and bulleted list
- More tools - Paragraph or Heading styles, subscript, superscript and strikethrough, font weight, line height, reset text styles
- Quick Actions - click here to toggle back to the Quick Actions toolbar
Element Tray
Click here to add elements to your page.
- Collections - adds pre-built groups of elements, such as headers and footers
- Text - adds a text box to your page
- Image - opens the Media Gallery. Upload, organize folders, or click on an image to add it to the page
- Form elements - click to add a text box, submit button or credit card input
- Panel - click to add a shaded rectangle you can use to group your elements (everything positioned within the panel will move with it)
- Media - choose from your own self-hosted video or a YouTube embed
- Menu - navigate around your sites with one simple element
- Countdown timer - click to add a countdown timer to your page
- HTML element - click to add custom HTML, such as an iframe or table
- More Elements:
- Horizontal/Vertical Line - lets you add horizontal/vertical line elements
- Icon - contains our library of icons for your use, which has been provided by Material Design from Google.
- Carousel - lets you create an image slideshow
- Facebook comments - click to add this social media widget
- Quizitri quiz - lets you embed quizzes from Quizitri
- Thrivecart - allows you to embed Thrivecart checkout widgets directly onto your page
- View Cart - shows how many product quantity are in the basket, including bump sales (new screenshot to be added after the release)
- Date - displays the current date dynamically on your page

Canvas
The editing area is where you’ll drag elements to create your page. It’s WYSIWYG, so what it looks like in the Editor is exactly how it will look to your viewers. The aqua guidelines show the area that will be displayed on a standard 900px resolution, and when you have Element Outlines turned on, these will show you boxes around elements for easier positioning.
Help
If you get stuck, click the question mark in the top toolbar to access the Convertri Knowledgebase, join our Facebook Group, watch the Intro Video, or email our support team. You can also click the button to start the Help Tour.