[Note: This feature is available on the Standard (plus the Page Importer) / Pro / Agency / Scale and Maximize Plans. If you need this feature and you would like to upgrade to a different plan please contact us at support@convertri.com]
Video:
Article:
Coupons Outlined
Welcome to Coupons! These are a great way to incentivise your users to buy your products. Now with Convertri you are able to send out discounted links to your checkout page. You are able to provide coupons for a fixed amount or for a percentage off of the purchase.
Creating Coupons
Let’s get started with creating Coupons. It’s advisable before you start this that you have a working Checkout page with your product set-up on ready so you can test your Coupons for yourself.
1. Go to the Cart dashboard from the top menu. Then select Coupons from the left hand menu.
2. Here you will have a full list of all the coupons you have in your account. Each of these has the option to Edit and also to Generate Link.
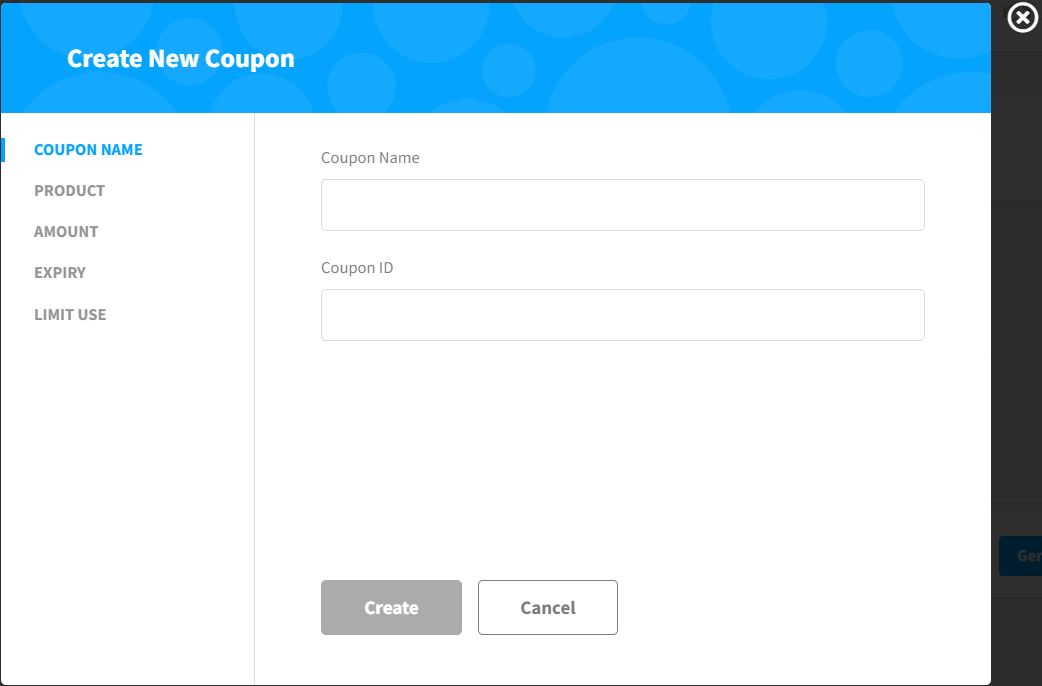
3. Click the blue button on the top right hand side labelled ‘Create New’ and the window below will appear:
4. Name the coupon something memorable, but also something you are happy for your user to see because this is the name of the coupon which shows in the modal checkout.
5. For the Coupon ID, you can either enter something here or leave it blank and Convertri will automatically generate one for you. This ID will appear in the URL of the link which you will use to send your users to your discounted checkout.
NOTE: You cannot have the same Coupon ID across several coupons, so this has to be set to a different ID for different Coupons. Convertri won’t allow you to save a Coupon with a Coupon ID That already exists.
6. Next, after setting your Coupon Name and ID, you can set the type and amount of the coupon in two ways:
Click the blue "Set the Amount" button that appears below the Coupon ID field, or
Click the "Amount" option from the menu on the left-hand side.
Either option will open the window where you can choose the Coupon Type and enter the Amount.
7. If you set the Coupon Type to Fixed from the dropdown menu, then you will be offered a box within Amount where you decide how much money you want to offer off. So if you want to offer a $5 discount then enter 5.00 into this box. The currency box is set to the currency which you have applied across your account.
8. If you set the Coupon Type to Percentage from the dropdown menu, you will be offered a box where you can enter a percentage off. So if you wish to offer off 25% off, enter 25 into this box.
NOTE: Recurring applies a discount to recurring payments or subscriptions.
9. Next, select Expiry. You will see this screen:
10. This is where you can set a timer on your coupon, meaning it expires at a certain time and date. Select the date and time from the dropdowns which you wish for your Coupon to expire on. Finally, check the Timezone dropdown aligns with your own, otherwise the expiry timing will be slightly off.
11. Next click on Limit Use This is where you can set the maximum number of uses. So if you want your coupon to have a usage limit (like for the first ten customers, for example). Leave it blank if you want unlimited usage for your coupon.
12. Once you have done all this, click the blue Create button.
13. Your Coupon will have now been added to the list of Coupons ready to send out.
Sending Out Coupons Links and Testing
IMPORTANT: Convertri's coupons use session cookies. This means the coupon will stick around across multiple pages as long as your prospect doesn't close their browser or tab. This means when you generate the link for your coupon, you should generate the link for the first page of your funnel. If your funnel is Optin -> Thank You -> Sales Page, and you want them to go to the optin page first, generate the link for the optin page, not the sales page. They'll still have the coupon cookie ready to use when they reach your sales page.
1. Now that you have created your Coupon, the next step is to generate a link to this Coupon so you can send it out to your users. On the Coupon you wish to offer to your users, click the blue Generate Link button.
2. A box will pop-up where you need to select the Funnel and then Page you want the link for.
3. Once you have selected these, a link appears which you can click on to Copy. This is the link you can send out to your users in order for them to get the discounted price.
4. To test this link out, paste it into another tab and press Enter. You will be taken your webpage as normal.
NOTE: How the discount is applied to your sales page will differ depending on what type of checkout is on the page. If this is just a simple on page checkout, the discount can only be viewed by making a Test purchase and then viewing the Receipt or viewing the Order in your dashboard.
5. Click your Open Checkout button to view your modal checkout screen. You will see your checkout as normal but the amount will be discounted and the discount name will be shown. There is an example below:
And that’s it! Your coupon is set up and working and you can start sending out the link to potential buyers.
Seeing Which Coupons Were Used
You can now see which coupons were used on orders and a breakdown of the discount this granted the user. To see this:
1. Go the Cart dashboard and select Orders from the left hand menu.
2. Here is a full list of all the orders which have been made across your whole account.
3. Find the order which you would like to know more about and select the blue Details text on this order.
4. Select the Product you would like to know more about and a dropdown will occur with extra order details.
5. This includes a Payment Breakdown which tells you the exact amount of discount which was applied to this purchase.
6. To the left of the breakdown is a header which says Coupon and under this will be the name of the coupon which was used.
Now you can see your most popular coupons and optimise!
Did this answer your question?Thanks for the feedbackThere was a problem submitting your feedback. Please try again later.